Wednesday, February 22, 2012

DIY Themed Earrings


Okay. So this is super easy and you can make some really neat earrings with this idea.

Generally, you find the main material for this project in the scrap-booking section although it could be anywhere there are buttons. These earrings are made from specialty buttons which are so freaking cute, I just had to find something to do with them! I made the cupcake earrings for to wear to birthday parties and other celebrations. I made the clovers because St. Patty's Day is quickly approaching and because they were sparkly ;)

Materials:


- Plastic specialty buttons, can have flat backs or plastic button loop (usually found in scrap-booking section at craft stores)
- A pair of nippers (if you pick buttons with loop on back. If you pick ones that have flat backs, you don't need nippers)
- E6000 glue
- Earring posts with flat metal piece for gluing


Directions:

Step 1: If you bought buttons with loops on the back, you will need to cut them off using nippers. Get the nippers as close to the back of the button as possible and squeeze hard. You want the back to be as flat as possible so the earring post will glue on nicely. If the buttons are more than one piece held together by backing, they may fall apart. It's okay- just glue the pieces back together and wait about 10 minutes before moving to step 2.


Step 2: Put glue on back of earring post and glue to back of button. Think about where you glue the post and how the earring will look on your ear depending on where you put it.


Step 3: Wait for glue to dry for about an hour and then try them on. It's that easy!


Wednesday, February 15, 2012

Mediterranean Pizza


I found this recipe HERE on Allrecipes.com and it has become one of our favorite routine dinners. Not only does it taste amazing but it's also relatively healthy. It's got a ton of veggies including an entire bag of spinach dumped on it. Healthy never tasted so good.

In addition, it doesn't use any pizza sauce or any heavy cheeses. Replacing the sauce is a mixture of pesto sun-dried tomatoes, garlic, herbs, a little bit of Parmesan cheese, and olive oil. Then you just pile on the toppings and bake! I'm going to provide the original recipe below with my healthy alterations in parenthesis.

Mediterranean Pizza (Originally: Pizza Without the Red Sauce)

Servings: 8 (More like 4 to be honest)
Time: To Prepare- 10 mins To bake: 15-20 mins

Ingredients:
- 2 TBSP butter, melted (I use margarine and cut to 1-1/2 TBSP)
- 1 TBSP olive oil
- 3 TBSP minced garlic
- 2 TBSP sun-dried tomato pesto (or 1 TBSP sun-dried tomato in oil and 1 TBSP pesto)
- 1 tsp dried basil leaves
- 1 tsp dried oregano leaves (I use an Italian herb blend instead)
- 1 TBSP freshly grated Parmesan cheese
- 1 unbaked pizza crust (I use wholewheat crust from Fresh and Easy)
- 1 tomato sliced (I omit because I don't care for tomatoes much)
- 1 (6-ounce) bag of spinach (I use organic prewashed)
- 1 sweet onion (I use half or so of a red onion)
- 1 fresh jalapeno pepper, chopped (This tastes kinda weird. If you want heat, used crushed red pepper instead- about 1/2 tsp to 1 tsp depending on desired level of heat)
- 1 6-ounce container crumbled feta cheese (I use about 4-5 ounces)

Directions:

Step 1: Preheat oven according to pizza crust directions.

Step 2: In a bowl, combine butter, oil, sun-dried tomato pesto, Parmesan, garlic, and herbs (if using crushed red pepper instead of jalapeno, add to mix as well). Lay out pizza crust and spread mixture evenly over it.


Step 3: Arrange tomato, onion, feta, spinach, and jalapeno on top of pizza. I like to place the toppings at different levels, some on top and some under the other toppings. It will look like a heaping mess but don't worry, it bakes down nicely.

Step 4: Bake according to directions on pizza crust container.


Wednesday, February 8, 2012

DIY Steampunk Gears Necklace


I have always been obsessed with watches, clocks, and gears, so when "steampunk" jewelry started to come into style, I was enthralled.

I had found a small package of these thin gear shaped metal pieces at Michael's and just had to have them. They sat in one of my craft supplies boxes for a few months while I thought long and hard about what to do with them. I bought some actual watch gears as well and added them to my box. A long time friend, Jolee, and I, had a craft night a couple months ago and came up with the idea to make necklace pendants using the gears. This necklace was the result:


This necklace is not difficult to make. Expensive? Well, kinda. I suppose that if you want to make a really cool one of a kind necklace, the price of materials might be worth it. If you want to make a bunch of these babies, it's also worth buying the materials.

Materials:

- Thin metal gear pieces (the ones in the photo range from about 1/3 inch to 1 inch. Unfortunately, I could not find a photo of these on Michael's website but I got them in the jewelry making section of Michael's). Here's an auction on EBAY of something that would work but if you want to keep this project cheap, find them at Michael's.


- Chain (between 14 and 24 inches depending on how long you want the necklace to be. See steps below for general guide on necklace lengths).


- Toothpick or other pointed object to apply and remove excess glue


Directions:

Step 1: Lay out your large gears in a formation that you like on a large piece of paper. Play around with the formation until you are happy with it. The gears need to be overlapping each other in a way that offers enough surface area to apply glue.


Step 2: Apply a small amount of E6000 to the end of a toothpick or other pointy object. Use toothpick to evenly spread glue on back of one gear and overlap on top of another gear. Press down and continue with all other gears until your formation has been completely glued together. Glue small gears on top of main formation. I tried to add these pieces to places that had too much glue bubbling out. Wait for about an hour to dry.


Step 3: While waiting, prepare chain by using side cutters to cut two equal length pieces that will be secured to either side of your pendant. A 14 inch chain (two 7 inch pieces) will yield an extremely short necklace but you have to add in the size of the pendant. If the pendant is 2 inches wide, you'll end up with a 16 inch necklace which is a pretty standard length. It should fall at the collar bone. If you want something longer, do a 16 inch chain (8 inches on each side). With the addition of a 2 inch pendant to the length, you'll end up with a standard 18 inch necklace. Please see the photo below for more lengths.

Step 4: Attach clasp to end of chain by opening jump ring with chain nose pliers, adding clasp and end of chain onto the jump ring. Close using pliers by squeezing it shut. Make sure the jump ring is fully closed. I swear half of the jewelry I fix is due to jump rings being slightly open. Repeat steps with other part of clasp and other half of chain.

If you have two sets of pliers,

Step 5: After gears are completely dry, remove from paper. Pull any excess paper off back carefully so that no paper can be seen from the front.

Step 6: Open 2 jump rings and find holes on either side of the pendant to put them through. Add one side of chain to each jump ring and close using pliers. Wait 24 hours before wearing to ensure glue is completely dry. Enjoy! Oh! And watch out for sharp parts that might protrude out of the small gears. You can clip off any sharp pointy parts with your side clippers. Don't say I didn't warn you!


Here's another one I made:


Check out my other DIY tutorials:

Thursday, February 2, 2012

6 Five-Ingredients or Less Appetizers


Super Bowl is coming up and if you're planning a party, you've probably got a lot to think about. These appetizers are perfect for laying out for Super Bowl Sunday and they all have 5 ingredients or less. Plus, they are pretty elegant. Who says you can't have a Super Bowl party with style?

Here's a list with amazing recipes. The links are in the picture and title description:


So if you've never had bacon wrapped dates, YOU ARE MISSING OUT!!! They are amazing! Here we've got bacon wrapped dates stuffed with blue cheese. I have never tried them but plan to make these to take to my father's house for his annual Super Bowl party. I think I will make half with blue cheese and half without since there are many people who don't care for bleu cheese. I will stuff my face with these babies, seriously.


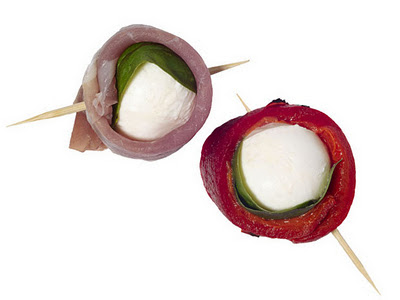
This is pretty straight forward. It isn't even really a recipe as much as it is a description. Buy some mozzarella cheese balls and wrap basil leaves around them. Then wrap thin deli meat or thin pieces of roasted red peppers. Secure with toothpick. Easy enough for a last minute appetizer!


This appetizer is just a must. It's so good and so freakin' easy, you'd be crazy not to serve it. Now why it's categorized under "low cholesterol" foods on the site is a mystery. Don't be fooled, these babies aren't low anything.


I included these for two reasons. First they look good and they are easy to make. Second, they have the word "monster" in the title of the recipe. Enough said.


Okay, so I really like blue cheese. Is that a crime??? I'm sorry, but the combination of blue cheese and sweet fruit is amazing. Even if you don't typically enjoy blue cheese, you MUST try it with the sweetness of honey, fruit, or fig spread before you make the final decision to never eat it again. It's truly an experience.


I admit that this is from this blog but it fits the post so I'm adding it in. Click on the link to find a few different combinations to top crostinis with- all five ingredients or less!


UPDATE: I made the bacon wrapped dates stuffed with blue cheese and they were amazing. However, next time, I'd probably leave the blue cheese out. To be honest, the flavor of the cheese gets lost in the overpowering taste of bacon and the dates. One thing that I did differently was to sprinkle a little brown sugar over the bacon before baking these. It added a little extra something that made them ever-so-slightly better.