Thursday, December 29, 2011

Crostini Combinations to Die For!


Okay, New Year's Eve parties are coming up and I've already provided some ideas for jello shot cocktail concoctions. Now that the drinks are taken care of, time for the food. These little crostinis are easy to make, look super classy, and are amazingly yummy.

I used goat cheese and bleu cheese (because they are my favorites in terms of matching them with toppings).


You could do a few combos with just these ingredients:


Like:

-Roasted garlic + goat cheese (roasted garlic how-to below)


-Roasted grapes + Crumbled Bleu cheese +drizzle of honey (roasted grape how to below)


-Bleu cheese + Fig spread (always a winner)
-Goat cheese + Fig spread
-Bleu cheese + honey

You'll need:

- Baguette sliced thinly and toasted
- Cheeses of choice
- Toppings of choice


How to Roast Garlic:

1. Cut off top of garlic head with sharp knife. Make sure all cloves are cut through. You can cut some on the sides shorter if need be. They just all need to be exposed.

2. drizzle top with olive oil
3. Wrap in aluminum foil and seal top by folding over multiple times
4. Bake at 375 degrees F for around 30-40 mins
5. Remove from foil. To extract cloves, either use a fork to pull them out, or break apart the garlic head and squeeze them out by pinching lightly at the base of each clove.


How to Roast Grapes:

1. Follow steps 2 and three from above using about 10 grapes. Line them up on foil and wrap tightly.

2. Unwrap and slice in half. Add to desired crostini topped with cheese.


Alternatively...

You can use pretoasted little toasts. I found these at my local Sprouts/Henry's. They are awesome since they are so easy to use and are miniature (which automatically makes them fall into the 'cute' category!).


YUM!!! ENJOY!!!

Monday, December 26, 2011

11 Jello Shots to Bring in the New Year!


I've searched the internet wide and far to find the neatest looking jello/jelly shots. Cocktails are an absolute must have at any New Year's Eve celebration and what better way to serve them up than in super cool looking jello shots?!? Find the links to these jello shot recipes by clicking on pictures.


Dessert Wine Jello Shots


Double Rainbow Cake Jelly Shots


Sugar Cookie Jello Shots


Mimosa with Orange Jelly Shots


Cucumber Lime Jelly Shots


Strawberry Margarita Jello Shots


Dragon Flower Jelly Shots


Butterbeer Jelly Shots (for the Harry Potter lover in you)


For a limited time, a previously featured shop is offering a discount for CookLoveCraft readers. Use the code CLC10 for 10% off products inCuriousCreaturesShop

Thursday, December 22, 2011

Chocolate Spoons for Hot Cocoa


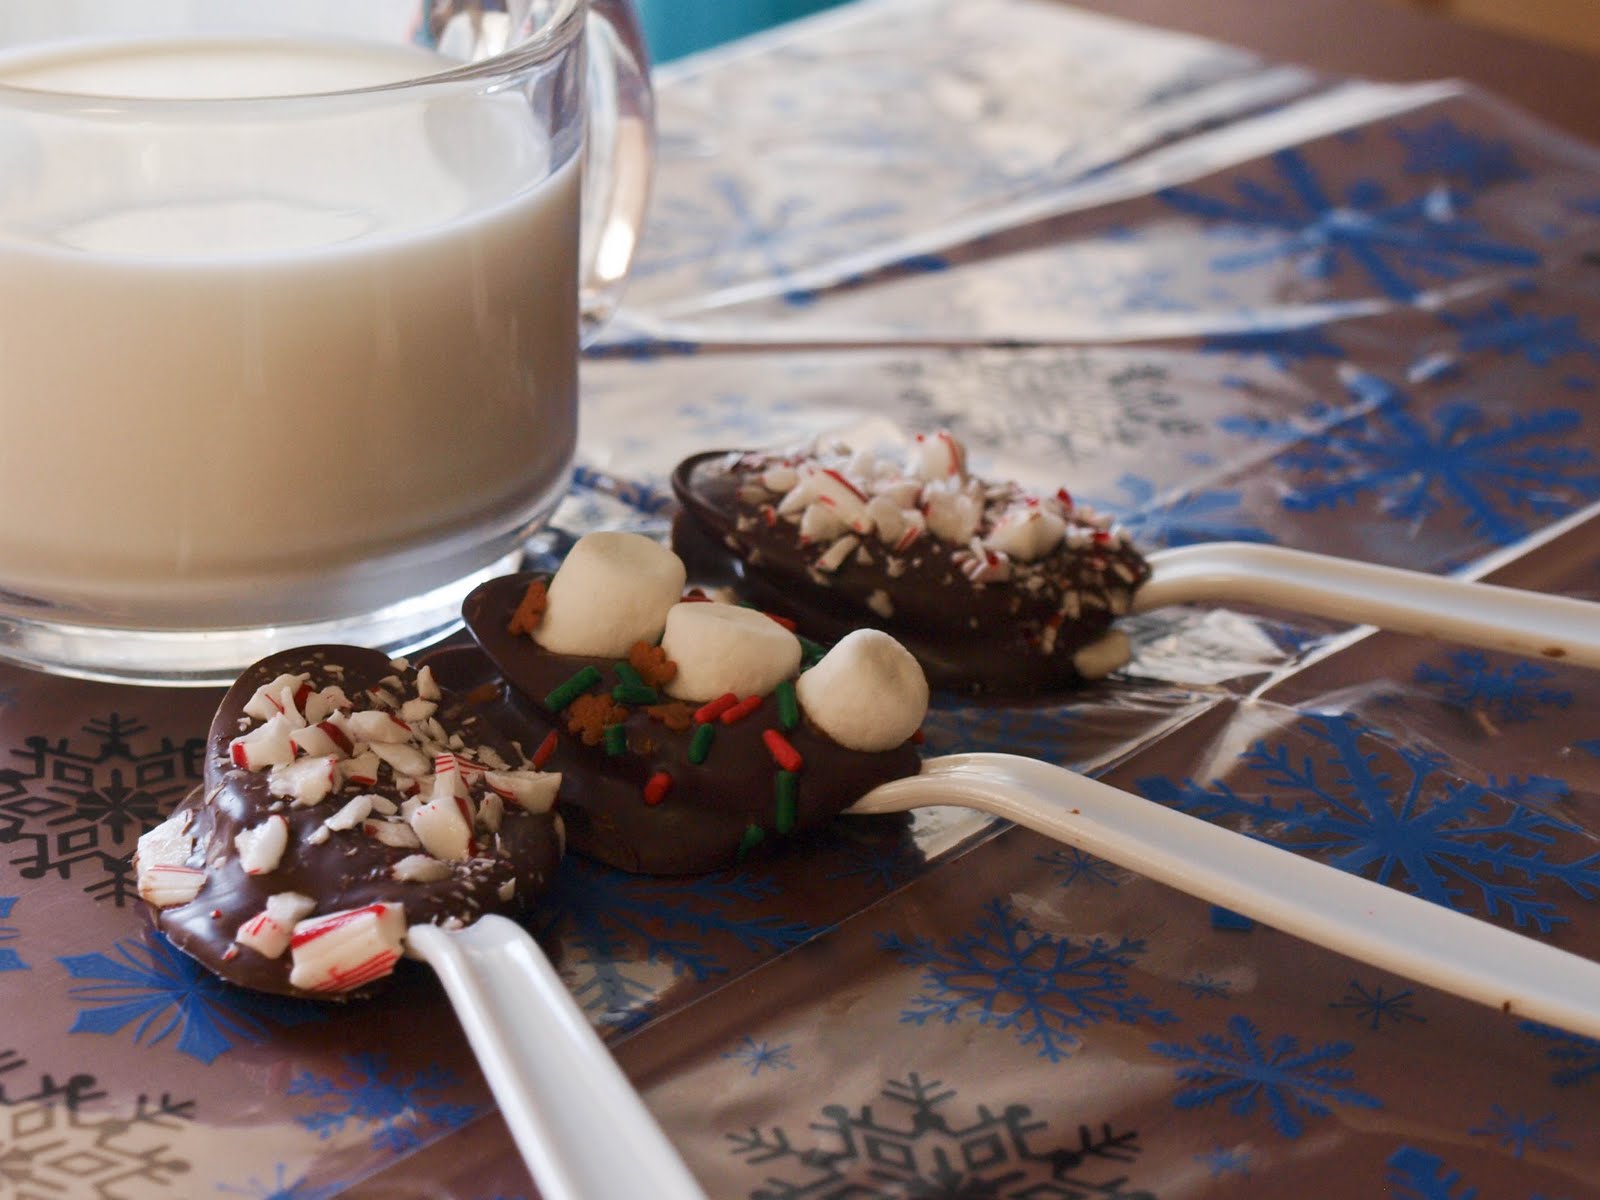
I had seen this idea a couple of times but I'm not sure that they were meant to be swirled in hot milk for the purpose of making hot cocoa. Instead, they were made to be eaten like candy. I am not a big fan of candy myself (although, I do occasionally eat candy if it's the right kind). I am, however, a big fan of hot cocoa. I will go for the chocolate mix in the package if I absolutely have to, but, if given a choice, I'd rather have real chocolate (not some processed powder) in my warm cozy beverage.

These spoons are a great way to give the gift of truly great hot cocoa and they look pretty as well! I gave a couple of tins of assorted baked goods to some friends and I included a few of these spoons with directions on how to use them written on the back of the tag I attached.

I went at this project rather ambitiously by buying a ton of random candies and chocolates. I loved the ones that were made with Hersey's miniatures that were various mint flavored. I tend to favor dark chocolate for these spoons because it gives the drink a richer and fuller taste that is much more difficult to achieve with milk chocolate.

There really is no recipe. Instead it's kind of a wing-it-as-you-go type of situation. What I can provide are tips to make the process more fool-proof and some ideas on what kind of spoons you can make.

Here are the ingredients I had on hand (Although I didn't use most of them):


Okay, so here we go:

Tip 1: Melting the chocolate. You really, really don't want to overheat the chocolate. I filled a mug with chocolate and placed it in the microwave for twenty second intervals, stirring between each heating. Do this until the chocolate is nearly lump free. It really doesn't need to be absolutely and completely smooth, it just needs to be warm enough so that if there are any lumps left, they eventually melt.

Tip 2: when you dump each spoon in to the chocolate, make sure it is overflowing and don't be concerned with neatness. Less chocolate will make for a neater looking spoon but a weaker taste. That is a trade-off I'm not willing to make.

Tip 3: USE WAX PAPER to set filled spoons on. This is kind of a no-brainer for those who bake or cook a lot. For those that don't... seriously, you want to follow this suggestion.

Tip 4: Chill finished spoon in fridge. I placed my spoons on top of wax paper that was spread out on a cookie sheet and slid the cookie sheet on to the bottom shelf of the fridge.

Tip 5: Specify the amount of milk to be used for each spoon to whoever you give it to. I used the ration of one spoon to one cup of very hot milk. Obviously if you use more milk, it will result in a weaker taste.

Tip 6: This is probably pretty common sense, but I'll say it just in case this post is confusing. You'll want to add any toppings to chocolate while chocolate is hot. I added marshmallows, sprinkles, and crushed candy canes to mine.


I made three different kinds of spoons. The first used dark chocolate melties as the base and marshmallows and sprinkles as the toppings. The second was the same dark chocolate but with crushed candy canes as the topping. The third, I used Hershey's dark chocolate miniature mint
squares as my base and added little red sprinkles to the top. The third was by far my favorite and gave the richest taste of them all.

Happy spoon making!


Tuesday, December 20, 2011

5 Easy Christmas Centerpieces using Cake Stands

With work hours picking up and Christmas coming soon, life has been busy lately. Usually I do all of my own DIY projects but I searched for some time looking for a collection of centerpieces that could be made using common things you might have around the house during Christmas times anyways.

All of these centerpieces use cake stands. If you don't have a cake stand, you can use regular plates and stack them on top of cups. All the photos are linked to the original sites that they came from. Happy holiday planning!


2 cake stands + pine cones + Mason jars filled with Epsom salt + votive candles+ Christmas tree branches


Cake stand + Large Ornaments + Christmas tree branches
Add candle sticks topped with ornaments if wanted


Cake stands + Clear/Silver/gold ornaments + Pine branches + cup + White Flowers


Cake stands + candy dish + Green ornaments + ribbon + fake green leaves


Cake stand + Pine Branches + Sparkly ornaments + Pine cones + holly


Saturday, December 17, 2011

DIY I-Spy Ornament for Kids

For those that travel during the holidays with children, you know how difficult it can be to keep kids entertained. Having little games they can play to keep themselves busy is almost a necessity.

This is a great use for any of these crafty ornaments you may have leftover. Depending on the age of the child, you're going to want to use different types of ornaments. Younger kids probably shouldn't have glass ornaments. I have seen plastic ornaments at Michael's that would be more appropriate. I did a pretty simple version just to get the idea across. Plus it came out pretty enough to hang if I wanted to.


Materials:
- ornament (alternatively, I've seen this done in mason jars for a more difficult and time consuming game)
- Filler beads (or rice in mason jar - for mine I used plastic pearls and plastic metallic beads)
- items to find (you can get pretty creative - I used charms and other miniature items I had laying around in my crafting supplies for mine)
- Hot glue gun and glue


Directions:

Step 1: make a list of what items you are going to put in your ornament or jar before putting everything in it.

Step 2: Take the top metal part off ornament (or lid off jar) and add beads and items.


Step 3: glue metal piece (or lid on jar) on to ornament using hot glue. Be careful! The metal will be hot.

Step 4: give to child, stuff in stocking, play a quick game yourself.... it's up to you!


Found the keys and the heart!


And now the feet and snowflake...

And it's so pretty!!!


Wednesday, December 14, 2011

Peppermint Hot Cocoa


This wonderful warm drink would be great served on Christmas Eve or Christmas morning. It's rich chocolate flavor is balanced perfectly with the freshness of peppermint. I made a cup for myself today and absolutely loved it. Plus, it's easy to make and on;y takes a few ingredients!


I found the original recipe here but have tweaked it to my liking.

Peppermint Hot Cocoa
Servings: 4 (about 1 cup hot cocoa each)
Time to prepare: 1-2 mins Time to cook: 5 mins

Ingredients:
- 4 cups whole milk
- 3-4 ounces dark chocolate (I used chocolate melties)
- 8 candy canes (4 crushed, 4 whole)
- toppings of choice (marshmallows, whipped cream, sprinkles, etc.)

Directions:

1. Pour milk into a medium saucepan. Heat until milk is hot but not boiling. Add chocolate and crushed candy canes. Whisk until thoroughly mixed and candy canes and chocolate have completely melted.

2. Pour into mugs. Top with favorite toppings (I used mini marshmallows) and stick candy can in each mug. Serve immediately. Candy canes can be stirred to add more mint flavor to drink.

Sunday, December 11, 2011

Uniquely handmade gifts from Etsy

CookLoveCraft has been up and running for two months now! Thanks to all my readers for making CLC a success from the start!

Having trouble tacking down those last few Christmas gifts? Etsy has so many wonderful handmade and vintage products. There's so many, that there's got to be something for that super hard to shop for person in your life. Take a look at some of the cool stuff I've seen around Etsy.


DNA Beaded Earrings in Fallen Leaves with Gold Filled Ear Wires


(This is actually a new line I'm starting in my store. I'm also considering eventually doing a tutorial on how to make these)


And, for a limited time, a previously featured shop is offering a discount for CookLoveCraft readers. Use the code CLC10 for 10% off products in CuriousCreaturesShop like the one below:


Saturday, December 10, 2011

DIY Memory Wire Crystal Bracelet


Like it? Don't wanna make it? Buy it here.

Using memory wire is a great way to make bracelets and other jewelry easily and really quickly. Plus, it requires fewer materials than other jewelry making methods. These bracelets fit most wrists. I have extremely small wrists, which can make finding bracelets that fit difficult, so it's nice to be able to make jewelry that fits correctly.


DIY Memory Wire Bracelets:

Materials:
- Memory wire, bracelet size
- Crystal beads, or whatever beads you'd like to use (I used a couple tones of purple)
- a pair of chain-nose pliers (and a pair of a pair of wire cutters if you don't have any built in to your pliers).


Directions:

Step one: Cut memory wire so that you have three full loops of wire. Using chain-nose pliers, grip one end of wire and turn it over so you have a small loop (see photo).


Step two: Pinch loop with pliers to close. This end will keep beads from falling off.

Step three: Add beads to the open end and move them along wire to the closed end. I didn't do a pattern with the different purples on mine, I just added them randomly and I liked the way it came out.


Step four: Make sure you have some room on the end to close the wire and to leave a little bit of slack for the beads to move around. If you put too many beads on, some may break when you try to put the bracelet on. I left about a quarter inch of room on the end plus room to close the wire off. Once you're done adding beads, close the ending off using the same method as above. That's it!


Like it? Don't wanna make it? Buy it here.