Tuesday, December 20, 2016

Intimate Rustic Backyard Wedding on a Serious Budget


It's been a long time since I've posted but having the most perfect wedding in our backyard will make you want to share some tips!

I set my budget between $3,000-$4,000 and was able to keep very close to my budget.

I had some help... a neighbor lent me lights and drink troughs they had used for the recent wedding of their daughter. They also had a gorgeous wooden sign with "Ceremony" printed across the front of it in metal print.

Okay, so here's the breakdown. For about 44 people:
-Beer and wine- $280 (2 buck chuck from Trader Joes was the big saver here)
-Linens and napkins- $153 (found on Etsy from www.etsy.com/shop/YourChairCovers)
-Flowers- $283 (I used dried flowers as an alternative to fresh flowers- not only did I save a ton of $$$ but they are gorgeous and won't die! www.etsy.com/shop/ArtistryinFlorals)
-Plates and Silverware- $78 (We used heavy duty plastic plates and plastic gold silverware from Amazon.com)
-Candles- $187 (36 assorted pillar candles and 72 votive candles from www.candles4less.com)
-Food ~$900 (The food and rentals were the most expensive things. I used one of my favorite restaurants and shopped around a bit. Lots of catering services will have a minimum of about $1,000 so $900 with tax and service fee wasn't bad. We had someone who was helping with the wedding pick up the food to save about $150 for a delivery fee)
-Rentals- $995 (By far the highest expense. We had help paying for this from a family member which was a huge help. The biggest cost associated with the rentals was the heat lamps. We needed 5 of them and they were about $75 a piece to rent but it was necessary when planning an evening wedding in December!)
-Miscellaneous stuff- $300 (I bought miss-matched wine glasses from local thrift shops as well as little glass containers for individualized succulent plants. There were other things too- a vintage looking dessert table from a thrift shop for $19, clear Christmas lights from Big Lots- $30, plastic champagne flutes from Hobby Lobby- $7 with coupon, Mr. and Mrs. gold signs $12 from Hobby Lobby on sale, Wooden planks and a blow torch from Home Depot- $50). There's more, I just can't list it all....

How we saved money:

-We did our research to find the lowest prices
-We used Etsy which saved us A LOT and it's nice knowing you're supporting a small business and that you have handmade stuff!
-We made a lot of stuff ourselves
-We spent a lot of time in thrift shops
-We had wonderful friends who were willing to help and we let them (and were careful to not ask too much). We were really lucky here- we had a wedding planner, a photographer, and an electrician who helped us make the day really special.
-We kept the guest list small
-We were flexible- go with an overall theme and buy items the fit but don't get so stuck on having specific items that you fail to see things that would work well.
-We made use of what we already had. Our yard is filled with trees and plants so we let them grow in the months leading up the wedding instead of cutting them back during yard work. Then we used the leaves to make garlands for the tables!
-We had a friend officiate- in California, it's free to be ordained. It takes about 5 minutes to become ordained and that's all you need! Check your state laws to see if it's cheap or free to have a friend officiate instead of hiring someone.

Now some pictures:


Instead of renting expensive farm tables, we got plastic tables, covered them with Ivory table cloths, and opted to buy wooden planks from Home Depot and torch them to give them that rustic finish. It really is easy to torch wood and make it look really neat on a budget. 

Using leaf clippings from our yard to create a beautiful garland down each table was also a huge cost saving project. It didn't take long and we used dried flowers from Etsy to accent the leaves.


Without the heaters, we could have cut our rental cost in half, but it was necessary since temps dropped into the low 40's/high 30's that night! We also picked up some blankets from the thrift shop and washed them in scalding water in case people were still cold.


These signs were an unexpected purchase when I came across them at Hobby Lobby. At 50% off, they were a steal!


We wrapped the napkins ourselves (me + bridesmaids) and tied twine around each one. Purchasing heavy duty plastic gold utensils from Amazon instead of a party store saved us a ton of money.


We used a vintage thrift shop table to serve dessert and opted for mini-cupcakes instead of large cupcakes which saved us quite a bit of money. People also seemed excited they were mini too! who knew?


Trader Joe's Charles Shaw wine saved the day. At around $2.50 a bottle, we were able to buy more than enough and fully stock every table full of wine.


During the wood burning process.


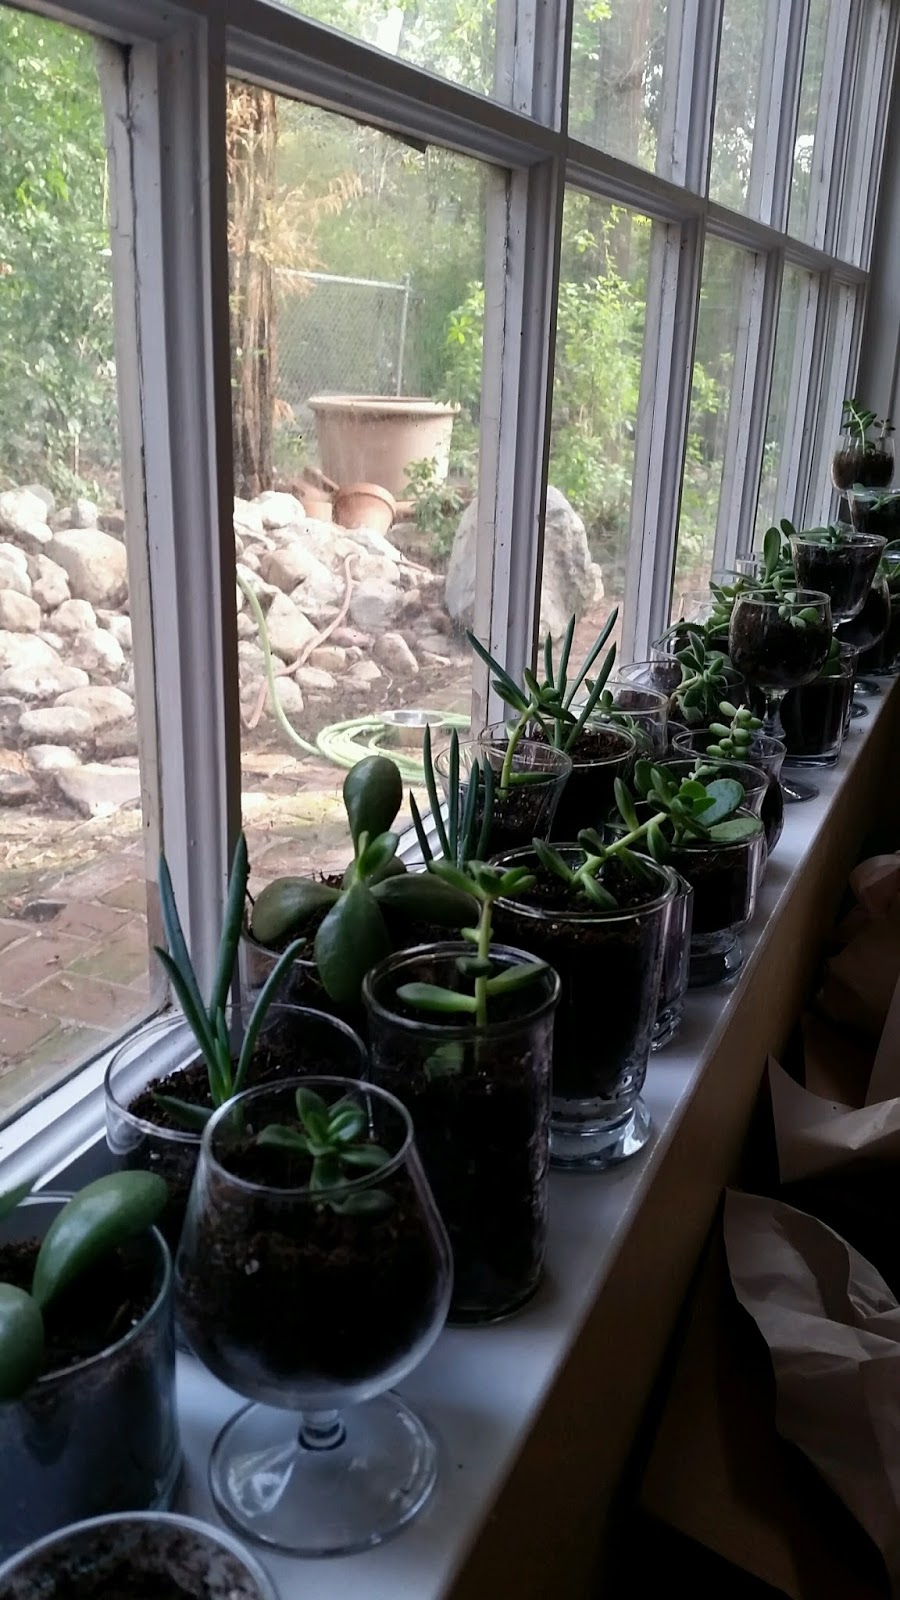
Party favors- Succulents from my yard clipped and placed in layered rocks and soil in miss-matched glass containers from the thrift shop. We also had some really cool little chocolate picture frames my Dad's girlfriend made us. I wish I had a good picture of them!


The dress: I found it for $65 on Amazon and it fit like a glove! I only ended up having to hem the bottom of it and have it steamed to get rid of wrinkles.

We had a wonderful time and are now happily married <3


Monday, June 2, 2014

Swordfish on the Grill

We BBQ a lot during the summer.

And, I really mean a lot.

We do the standard hotdogs and hamburgers. But we are also a big fans of Swordfish.

I wish I had a picture, but I don't, so this will have to do (it really does look pretty much the same):


Here's a really good and very easy recipe:

Swordfish on the Grill:

Serves: 2
Time to prep: 10 minutes
Time to marinate: 1-2 hours
Time to cook: 10-20 minutes (depending on thickness)

Ingredients (these do not need to be exact since I usually throw this together without measuring):
- 2 swordfish steaks (about 1/3-1/2 pound each)
- Juice of 2 lemons
- 6 cloves of garlic, minced
- 1/4 cup olive oil
- Fresh chopped parsley (optional)
- Salt and pepper to taste

Directions:

1. Place swordfish in a shallow dish.
2. Combine remaining ingredients and pour over swordfish
3. Cover and refrigerate for 1-2 hours
4. Heat grill to medium heat and place swordfish on grill
5. Use brush to occasionally coat fish with more marinade juice during the first half of cooking.
6. Flip fish once halfway through
7. Remove fish when middle flakes easily with a fork


Oh, like the picture above? Here's the link to that recipe. It is a Swordfish with tomatillo and corn relish. Yum!

Wednesday, December 4, 2013

Tried and True Recipes found on Pinterest

So, I've been trying lots of recipes that I find while spending hours on end on Pinterest. I pin A LOT. Most of it, I don't make. I have a fear of cooking recipes that have no rating! I know. Crazy talk. So, I decided to switch it up a bit and try recipes not because they have amazing ratings, but because they look and sound really, really good. And you know what? Lot of them are.

Here are some recipes. My modifications are written below each picture. I've listed them by how much I liked them.


1. Tomato and Basil Chicken with Pan Sauce

http://centercutcook.com/tomato-and-basil-chicken-with-pan-sauce/

This is one of my favorite recipes. I use about 2/3rds of the cream cheese and boil some angel hair pasta to serve it over. In the summer, I usually have tomatoes and basil growing in my garden and it tastes even better with ingredients from the garden. YUM!


2. Grilled Rib-eye Steak with Onion-Blue Cheese Sauce

http://thepioneerwoman.com/cooking/2009/09/grilled-ribeye-steak-with-onion-blue-cheese-sauce/?crlt.pid=camp.n9kWqzDKyXwn


I actually made this tonight and OMG! It was AMAZING. I'm not usually much of a red meat fan, but a girl can change for food this good. I made my steak in a cast iron skillet. Salt and pepper the steaks generously. Preheat your oven to 400 degrees F. Find your cast iron skillet and get it screaming hot. Throw some butter in there (carefully!!) and when it starts to bubble, throw your steak on. Sear on either side (1-3 minutes each side depending on the thickness of your steak) and then move the skilled into the oven for an additional 4-8 minutes (depending on thickness and desired cook). Remove from oven and move to another surface and let those babies rest for 5 minutes before you cut into perfection. Serve with that amazing onion sauce. I also made an asparagus and mushroom saute to go along and it was perfect!

http://www.simplyrecipes.com/recipes/pork_chops_with_dijon_sauce/

This one is all about the sauce. Make more of it if you're a sauce person. You won't regret it.

http://www.the-girl-who-ate-everything.com/2012/10/baked-chicken-chimichangas.html

I used EVOO cooking spray instead of butter to coat my tortillas before baking them to perfection. This is a quick go to meal for leftover rotisserie chicken. It's a keeper.

http://www.closetcooking.com/2011/04/jalapeno-popper-grilled-cheese-sandwich.html


I've made these several times simply because people keep asking me to! I also just use whatever bread I have. Sourdough is not necessary and I honestly haven't even tried it. I can't really imagine it actually being any better than what it already is.

6. Light Philly 20-Minute Skillet Salmon

http://allrecipes.com/recipe/light-philly-20-minute-skillet-salmon/detail.aspx


Okay, so this one is on a site that rates recipes, but I HAD to include it because it's a favorite. Yet another one of those recipes that is simple and amazing. I've used dried dill as well and it was just as good- or almost just as good.

Check out my personal recipes as well. Find them by clicking on "recipes" over there somewhere --->

Tuesday, October 1, 2013

Garlic and Bacon Chicken over Cheesy Polenta with Broccoli - Gourmet in under 30 minutes!!

Well hello again!

Yes, I know it has been far far too long since my last post.

About a million and a half things have happened though. Let's see...

It starts with getting a full time job and subsequently getting promoted a few weeks later into a position I love but that takes up a lot of the free time I used to have. It goes on to getting a female Decker Rat Terrier puppy that my fiance named Sweetpea. 6 months after that, we got a second puppy, same breed, that I named Jax. They are both the best dogs one could hope for. I only have a small handful of "terrible puppy" stories. Both have been great.

Then after getting two dogs, we decided we were done with apartment living and found the most amazing house to rent.

 Sweetpea and Jax

 JAX: AKA "Little Man"- He likes the mud!
Sweetpea watching the trees for squirrels 
The new house!! 


Okay. There are my five excuses for not posting. I apologize, and I will strive to do better.

That being said, let's get to the food.


Now this recipe is pretty much the easiest and best tasting thing you will ever eat. It relies on a couple giant shortcuts. When it tastes as good as it does, you won't know the difference. I used to make this dish from scratch. It was inspired by one of my favorite restaurants in Claremont, CA named Union on Yale. I'd eat there everyday if I could- but that would be expensive (although far less expensive than what you'd expect to pay for such high quality food).

First thing's first; here's the base ingredients (yes that's right, a rotisserie chicken- don't hate!):


I use some other things to jazz it up, but it's pretty personalizeable from here on.

Start out by adding your polenta to a small sauce pan. Yes, I found the most amazing frozen ingredient that has probably ever been made. Thank you Trader Joes for making the poleta FOR me. I am forever in your debt. If you don't have a local Trader Joes, all is not lost. It WILL take longer than 30 minutes though. Look HERE for a good polenta recipe and note that you may not need to add milk or Parmesan like I do.


In a medium saute or frying pan, fry your bacon (Note: I only made one serving so you'll have to double or quadruple the recipe as needed).

Remove from heat when crispy, add chopped garlic. You can cook it just until it's slightly golden brown or you can cook it longer to add crispiness (just my personal preference for this dish).

Remove garlic, add some slices of chicken, just to heat through (this can alternatively be done in the microwave, but I like the taste it adds by heating it in the bacon grease.

At this point, check your polenta and stir until texture is creamy. I add milk and Parmesan to heighten the taste a bit. It doesn't need a lot. I just add enough milk to get a creamy texture without adding so much that it gets watery. Then I throw a palmful of grated parmesan and stir until it looks and smells amazing.


Optional: Add broccoli or brussels sprouts to the saute pan. let it soak up any residual bacon grease. Remove when just cooked through (I used frozen broccoli that I steamed in the microwave until no longer frozen and then cooked until done in the pan).

Now just get a plate or two and pile it on- polenta first, followed by bacon and garlic, and then the chicken and broccoli or brussels sprouts.


That's it. Do this when you have people over. They will come back and probably often. Unless you don't like them. In that case, do not feed them this dish under any circumstances ;)

The actual Recipe?? Well, since I usually eye it, I'll do my best.

Garlic and Bacon Chicken over Cheesy Polenta with Broccoli

Time:      30 minutes or less (with shortcuts)
Servings: 1 or 2 (depending on if you have sides or not)

Ingredients:
- Leg and thigh from a rotisserie chicken
- 1-2 slices bacon or thick Pancetta (I prefer the taste of Pancetta but not the price)
- 3-4 cloves of garlic, roughly chopped
- Trader Joe's Creamy Polenta (or other prepared polenta- see above for link)

Optional:
- Milk to taste
- 3-4 TBSP Parmesan cheese
- 1/2 cup broccoli or Brussels Sprouts

Directions:
1. Add your frozen polenta to a small sauce pan and follow directions on back of bag to heat through.
2. In a medium saute or frying pan, fry your bacon.
3. Remove from heat when crispy, add chopped garlic. You can cook it just until it's slightly golden brown or you can cook it longer to add crispiness.
3. Remove garlic, add chicken, just to heat through (this can alternatively be done in the microwave, but I like the taste it adds by heating it in the bacon grease.)
4. Check your polenta and stir until texture is creamy. Add optional (although highly reccomended) milk and Parmesan. Continue to stir until cheese is melted and fully blended.
5. Take your chicken off the heat.
6. Add broccoli or brussels sprouts to pan and heat until just cooked through.
7. Pile it on a plate- polenta first, followed by bacon and garlic, and then the chicken and broccoli or Brussels sprouts.


I usually have about 80% of these ingredients already in my fridge. I regularly buy a pack of bacon and freeze it just so I can use one or two slices at a time.

Tuesday, September 4, 2012

Portobello Mushroom Burger Recipe

I've been doing my best to cut down on red meat. However, I love a good burger. I also love mushrooms. This recipe combines the best of both.

A good friend of mine, Suzanne Schneider, has an awesome cooking blog. This is one of her recipes.

I have provided the ingredients and directions with my personal changes. For the original recipe, please click here.


Portobello Mushroom Burger
2 Servings

Ingredients:
- 2 Large Portobello Mushroom Caps
- 1/4 Cup of balsamic vinegar
- 2 TBSP olive oil
- 1 tsp dried basil
- tsp dried oregano
- 1 TBSP minced garlic
- salt and pepper to taste
- 2 hamburger buns

Toppings (Pick the ones you'd like):
- Onions (I use thinly sliced red onion)
- Spinach, lettuce, or arugula (I use spinach or arugula)
- Tomatoes
- Cheese (I used provolone)
- Mustard, Ketchup, Mayo (I only use a little mayo)

Directions:


1. Place the mushroom caps, smooth side up, in a shallow dish. In a small bowl, whisk together vinegar, oil, basil, oregano, garlic, salt, and pepper. Pour over the mushrooms. Let stand at room temperature for 15-30 minutes, turning once halfway through. (I have also let these marinate all day in the fridge with great results).

2. Preheat grill or saute pan for medium-high heat (I haven't tried to grill these yet).

3. Brush grate with oil or spray pan with cooking spray. Place mushrooms on the grill/pan. If on grill, reserve marinade for basting. If in pan, add to pan with mushrooms. Grill for 5 to 8 minutes on each side, or until tender. Brush with marinade frequently. If in pan, cook 8-10 minutes on each side, or until tender throughout (cooking time will depend on thickness). Top with cheese during the last 2 minutes of grilling/cooking.

4. Warm up buns on grill or on stove and top with mushroom cap. Add desired toppings and enjoy. 

Grab some napkins! This one's juicy!


Saturday, August 4, 2012

DIY 3 Toned Key Necklace

Well, life has been crazy busy. My poor Olympus DSLR bit the dust last month. I replaced it with a Canon T3 which has been amazingly awesome. At the end of July, we moved to a new apartment.

I may be doing a post on cute decorating ideas I find around the internet since I'm going to be putting some time and energy into decorating our new place.

Like it but don't wanna make it?? Buy it HERE. (Please message me through Etsy if the item is sold out and you would like one).

As for now, a tutorial on how to make this necklace:


Materials:

- Three key pendants in different metal tones
- Four to five jump rings
- A small metal ring
- Approximately 20 to 26 inches of chain (depending on your preferred length)
- A clasp set
- A pair of chain nose pliers (two sets of pliers if possible but one will work too)


Here are the keys I found. They came in a package at 
Michael's like the one shown below.


I used about 20 inches of chain for my necklace. 
It was a medium thick chain:


Directions:

Step One: Open a jump ring using pliers. If you have two sets of pliers, look here. If you only have one, put the tip of the pliers into the center of the ring and open carefully. You only want to open them enough to allow the key and the metal ring to slip on to it. 


Step Two: close jump ring around key and metal ring. If you have one set of pliers, just push the ring back together so the gap closes. If you have two pliers, refer to the link above.


Step Three: Repeat with all other keys until all three are on the metal ring.

Step Four: Find the middle point in the chain and lay the chain out so that there is equal length on both sides and the middle forms a U. Pull middle through metal ring:


Step Five: Take the loose ends of the chain and pull them through the U. Make sure you pull them through so that there is still equal length on both sides. No lop sided necklaces! =)


It should look something like this:


Step Six: Attach Clasp. How you do this will depend on the clasp you choose. I had to use a jump ring to secure half of it. The actual clasp itself had a sort of built in jump ring that worked great. See below how I did mine:


Opened with pliers:


And shut with pliers:


The other part of the clasp, I attached with a jump ring. Just use instructions above on how to open and close jump rings to do that part.

And here it is with a clasp attached to it:


Okay, now go out wearing it and gather some compliments. Nothing feels better than people asking you where you got your necklace than when you can answer "I made it!"


I also made this one with slightly larger keys and a longer chain:


 Like it but don't wanna make it?? Buy it HERE. (Please message me through Etsy if the item is sold out and you would like one).